STASH-STORIES
DIY Stash Box – A Stash Story
A Stash Story: DIY Stash Box
“Why did I choose to make a DIY stash box? Well, I know there are lots of cool stash boxes on the market these days, but I’m just not in a position to spend money on one. I’m a broke ass community college student with books and avocado toast to buy.
That’s why I decided to go ahead with a DIY stash box. I’m not super handy in the sense that no one screams “ASK BRAD!” when something’s broken around the house and needs repair. But I tell you, what I lack in handiness I make up for in creativity and determination or so my mom says…
Speaking of my mom, she’s the reason I need to build myself a stash box that’s forever in incognito mode.
I thought to myself – what’s something in my room that not only does my mother not understand, but something she’d never had and never will have the need to touch, use or even stare at. That honor belongs to my Xbox. She’s never had an interest in my video games and I’m assuming that will never change. She will never know about my super incognito DIY stash box!
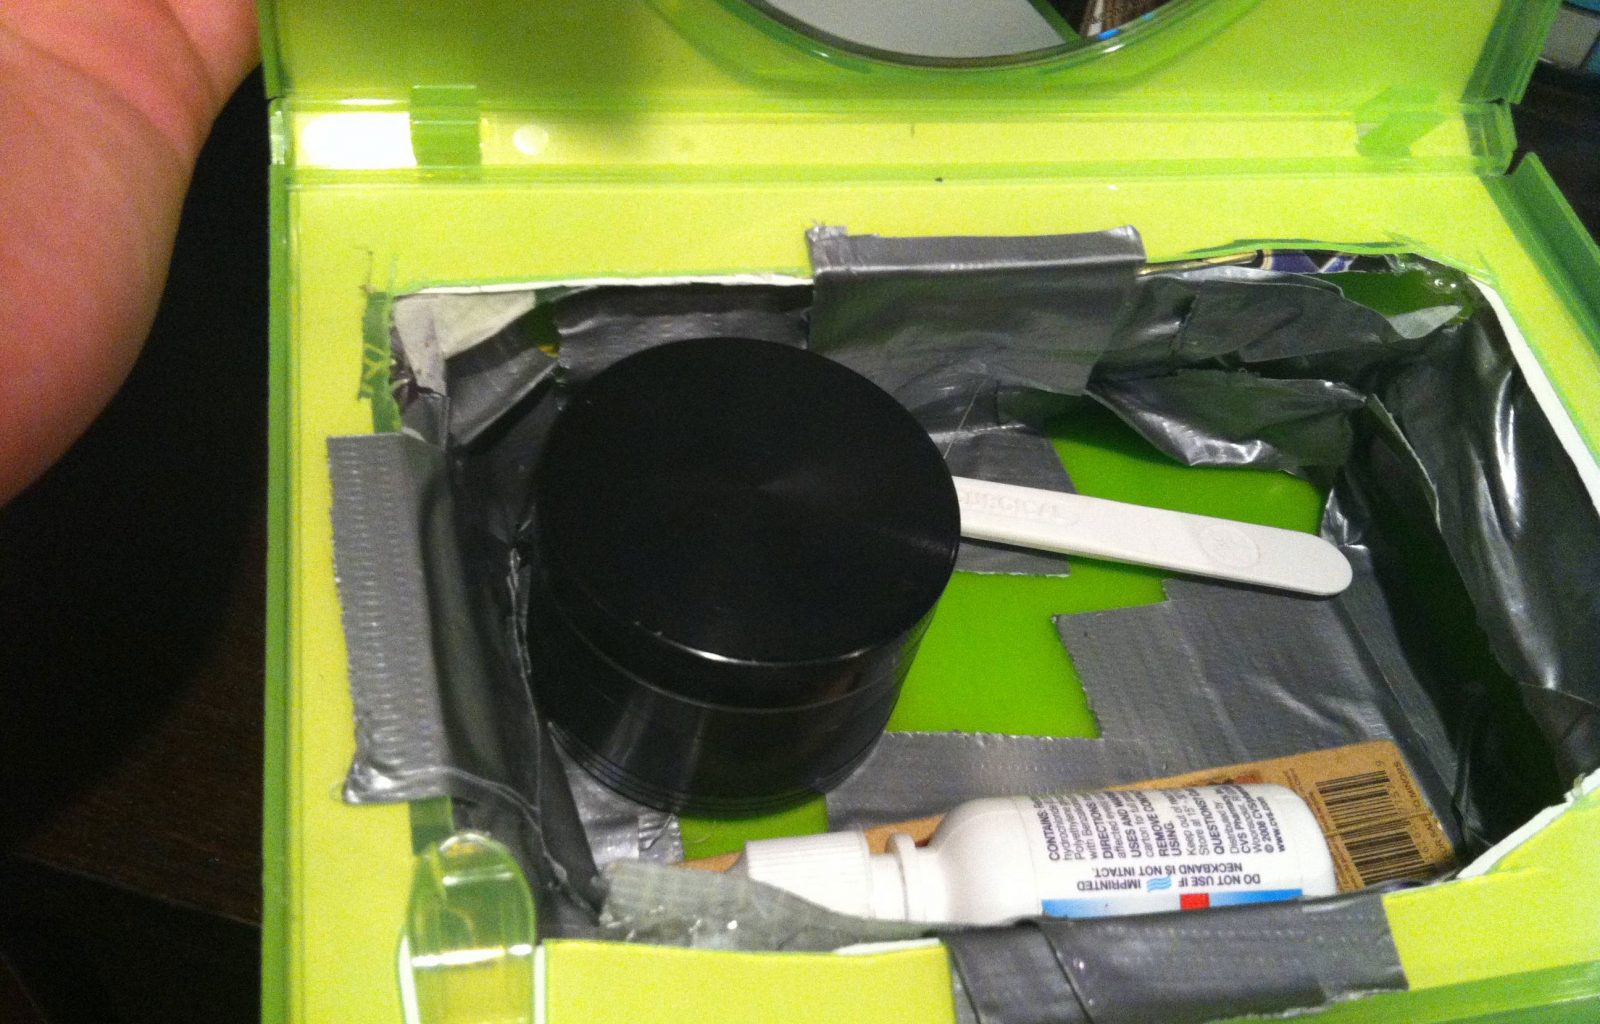
The “Stashbox 360”
Step 1 – Find the materials needed for my DIY stash box that’ll never make mom suspicious – Check
After days of beating myself up over what to use for my DIY stash box, I realized it was right under my nose the whole time.
Step 2 – How will I make this work?
Okay super, I’m going to use an empty Xbox case to store my weed. But wait, won’t that be too thin? (of course, it was too thin). I decided that I’d need 2 if not 3 or 4 boxes to stack one on top of one another. Inspired by a quote I heard in an old movie, it was time to go big or go home. 4 boxes? No problem. DIY stash box is starting to come together now.
Step 3 – Cut out and dispose of the fronts and backs of two of the games.
Same went for the back of another and the front of the last one. This is harder and a little more dangerous than I thought it would be. I’d suggest using a sharp but safe knife and go about it very carefully. I cut myself with the plastic only once but it could have easily been a dozen times. In case you’ve never cut yourself with a jagged plastic edge, just imagine a paper-cut on steroids.
Actually, more like a paper-cut x 1000
Step 4 – Glue the boxes together and you’re done (not really though…)
It was hard to glue the boxes perfectly together, so they ended up being uneven in their stacking… which ended up making this DIY stash box even MORE awesome. My stuff is usually a mess and that includes my games. They’re never stacked perfectly even so having them glued like that would have drawn unwanted attention for sure. Sometimes things just work out and you’re like “wow, life is cool sometimes!” I’m sorry I’m a little/lot of bit high at the moment.

Stash (X)Box – Mom Will Never Know
The final step to complete my DIY stash box was making sure that there were no jagged plastic edges that I’d inevitably cut myself on. I used some duct tape and while it doesn’t look so fresh, it gets the job done. Confession: until last year I thought it was duck tape. Like, a tape made from ducks. It took my first experience smoking Blue Dream to figure that out on my own. Good times!”
Most cannabis enthusiasts have a special container in their life, just like this stash box with a lock! It’s a container that holds many things very near and dear to their heart. Papers, grinders, filters and more, a stoner’s stash box can tell you a lot about the owner. Is it big? Small? Dirty? Clean? Organized? Or messy? What about the story behind it?
In a Stash Story, we try to reveal the personal touches to choosing a place to store your herb. Your stash box could be a gift, a discovery, or an epiphany. But we want to see it!


Merry Jane’s Jim Baudino Gets Into The Weeds
.Merry Jane’s Jim Baudino Gets Into The Weeds on Episode 68 of Puff Digital’s Cannabis Infused Long From Interview Podcast...


Famed Photographer Ophelia Chong returns to Into The Weeds
Famed Photographer Ophelia Chong returns to Into The Weeds along with genius marketing consultant, Chris Husong On episode 69...


Legendary Cannabis Advocate Jamie Shaw Gets Into The Weeds
Las Vegas Sessions continue with legendary cannabis advocate Jamie Shaw getting into the weeds on ITW Podcast On episode 67...


